Showing posts with label cards. Show all posts

Wednesday, September 18, 2013

Taking a birthday spin!

www.desiree-at-play.blogspot.comJust like every other craft hoarder out there, I have tons of stuff that I’ve never used… like these stamps, and ribbon, and spinner. There’s a lot of craft stuff stored here and there that I haven’t used. And I always feel so good when I break something out of it’s package for the first time and do something with it!

The stamp set that I used is called Take a Spin from Stampin’ Up! I pulled out my markers and colored each of the sections a different color (Blushing Bride, Soft Suede, Pear Pizzazz, Pool Party) to coordinate with the cardstock. Most everything I used is a Stampin’ Up! product unless specified.

www.desiree-at-play.blogspot.com

I used a set of Spellbinders for the stamped piece and the Pool Party cardstock underneath it. I ran a piece of Blushing Bride cardstock through a Swiss dot embossing folder and swiped it with white pigment ink. The crocheted pink ribbon is from the stash of goodies I received from Melissa Frances last April.

www.desiree-at-play.blogspot.com

I used some softly colored paper scraps and the Mini Royal Rose die from My Favorite Things for the roses. They looks so sweet on this card and make a great accent. The leaves were made using the Little Leaves Sizzlit.

www.desiree-at-play.blogspot.com

This is the inside of the card… and this is exactly how it looked when I gave it to her. Yeah, because I FORGOT to write something inside and sign it. And since I put it in the cool little clear box and enclosed it with a fab little belly wrap, I couldn’t just rip it open and write something at the last minute. Luckily she knows just how wonderful I think she is!

www.desiree-at-play.blogspot.com
Little Charlotte is working on developing her artistic talents too. We stationed her at the picnic table with some acrylic paint and a canvas. She was very focused and had the best time creating her masterpiece. Oh, and she did get a smidge on the canvas too, heeheehee!

Summer’s ended and the rains have begun. It went by too fast!!!

Are you looking forward to fall or lamenting summer’s end? Or maybe both?

Thanks for visiting,
Desiree

Tuesday, February 12, 2013

Sprucing up for Valentine’s Day

Be Mine card
Generally, I’m not a Valentine’s person. In the past I haven’t really been into the decorating thing, or really the giving of gifts (except for my girls), or making special treats. However, this year I feel different.

There are so many cute Valentine’s crafts that I’ve pinned on Pinterest. And I just had to try a few…

First, I saw this pin but instead of hanging my heart, I put it in a frame. It was a pitiful little gold frame at Goodwill. I painted it white with a little brown glazing to show off the design.

Valentine's layered heart

I used cardstock, tissue, patterned paper, music sheets, and book paper for the hearts. I sewed them down the middle on my sewing machine. The background is a piece of cardboard that I Painted white and then sprayed with a few different reds. I also painted a little brown in the grooves to make the texture stand out a little more.


Valentine's love lettersI also picked up some letters At Joann’s to spell LOVE and painted and glittered them white. I was inspired by this pin. I wish that I had used a chunky glitter but I didn’t have any and didn’t think to buy some. Instead of red, I picked white because it would show up better on my mantel. I live in a rental and the fireplace wall is paneled.

Valentine's bottleI decorated a little bottle that I also picked up at Goodwill. I needed some additional items to fill up my mantel. I used some scrap paper, ribbon and a little heart shaped button. It’s a little cutie.
Luckily, I also had several white candles and two larger frames. Last year I made a “Be mine” banner in a class at Art Soiree. Overall, I think that I was able to pull off this Valentine’s décor bit. Here’s the mantel…

Valentine's mantel

And here is a large frame that I hang little goodies from. The frame is quite large, about 4’ by 3’ and it’s about 5” thick. I put this together in another Art Soiree class. We painted and distressed the frame and hung wire from side to side. We get together often to create new art bits to hang in the frame. for February I pulled paper out of my stash and ideas out of my head and any Valentine’s ephemera I could find. This photo doesn’t do it justice.

February frame

Are a lover of Valentine’s Day? Do you decorate and go all out or keep it low key?

Visit thecsiproject.comI entered the CSI Valentine's themed decor challenge. Go check it out!


Happy Valentine’s!
Desiree

Monday, February 6, 2012

Catching up

Hello all,

charlotte 035Sweet little Charlotte is now 7 months old. She is crawling, standing, and getting around quite well. I just love her to pieces and spend almost all of my spare time with her. My craft room has been sorely neglected. The only thing that I’ve done in there recently is go through lots of stuff and make a pile of things that need to find new homes.

My creative endeavors

SANY2042Over the last six months I signed up for a few online classes and I’m behind in all of them… but I’ve enjoyed the inspiration and luckily I can do the creating when I want to. Those classes are She Art 2, Soul Restoration 2, and Spark Your Christmas.

Last Fall I was really lucky to get in to a local class taught by Melody Ross, cofounder of Brave Girl’s Club.  I SO admire her and when I found out that she was coming to Camas to do an art show and teaching an art class I could hardly contain myself. My piece is not quite done (no surprise there) so look for that in the future (no promises when, heehee). I was also lucky to get one of Melody’s art pieces during the silent auction.

I also took a couple of fun workshops with Denise (Junque Soiree) that were awesome. We created a fabulous “Wicked” banner for Halloween and some really cool mini scrapbooks. I am looking forward to more of those. It seems that scheduling time out of the house to be creative works the best for me these days.

Resolutions?

I decided that I really have to do something this year besides gaining another 10 pounds. I’ve done that 5 years in a row and it ain’t pretty. So it’s not really a resolution, more like just a decision that I need to do something.

MMEWBlack125pxSo this year I am taking Move More, Eat Well at Big Picture Classes. The Move More, Eat Well class is about documenting your year long journey to healthy living. I can’t say that I have been super successful in that area lately.

January was a hit or miss kinda thing but I am moving in a direction. One of our assignments was to commit to doing one thing. Could be a small thing, or a big thing. My one thing was to stretch every day. My massage therapist, Stefanie Adams, had given me two charts with stretches that would help with the pain I’ve been experiencing behind my left knee and some for overall body flexibility. Out of 31 days I did it 15. A mere 50%. OR Woohoo, I have a 50% success rate!!! YAY!

Valentine’s Day is coming up…

SANY1959Here’s a pretty card that I made for Valentine’s. I have several different ones that I’d like to sell – I need to find a little shop where I can do that.
I can’t possibly tell you the supplies that I used since I made it last year. It’s actually the a card front rather than a card that opens. It measures 4” x 6”. The base is a pretty pink. I used three strips of patterned papers and a piece of textured white that I stamped En Francais (retired Stampin’ Up! background stamp) in Soft Suede on to. In the corner I added a white pearl.

SANY1961I covered a chipboard heart in Real Red ink then covered it with glassy glaze and chunky clear glitter. I also tied a piece of lace to it. I layered the heart on to a bingo card that I added a bit of lace sticker to. 

Look at all the lovely glitter! I also really like the bit of lace sticker that I added to the bottom of the Bingo card. Originally it was white but I inked it up a little to give it a little pop.


NA_top

For those of you that are Stampin’ Up! enthusiasts, Sale-a-Bration is here!

Take a look at the brochure (pdf) and all the wonderful free items you can get when you spend $50 (before shipping/tax). When ordering online don’t forget to select me as your demonstrator to get the preferred pricing.

There are also extra free items when you host a workshop. Demonstrator kits are $125 plus you get designer paper or digital downloads for a whole year! Now that’s a great deal! Sale-a-Bration ends on March 31 so don’t delay.

Happy crafting!
Desiree

Monday, March 28, 2011

Fabric flower

I saw this card on Schwoo!’s blog and decided to CASE it. I love the flower and I watched the video on how to make one with Gluber. I don’t have Gluber, so I cut a circle out of a piece of Stampin’ Up! Sticky Cuts adhesive sheets. The fabric strip that I had in my ribbon box was hand dyed with walnut ink and stamped with a leaf image. I got it at my local scrapbook store, Arts and Scraps.


The flower is fairly easy to make and will get even easier with practice. Using a Gluber would be better then the sticky cut circle I think because it seems that it’s more gluey. Maybe I am imagining that since I’ve only seen it in the video. I did end up adding a bit of glue here and there under some pieces of fabric as I went along.

The card is simple with the focus on the flower. I really like how it turned out. Besides the base, all other pieces are from my scrap pile.

SANY2043I am still having fun with my SheArt Workshop. Here’s one of my recent canvases. The head is a bit too big, but she’s in Paris so who cares, right?

Can you see the texture? Underneath her is a crumpled sheet of a McCall’s pattern, there are doilies, journal paper, textured paint, rub ons, and stamped images. 

Tomorrow I am meeting a guy I’ve been matched with on eHarmony. Wish me luck!

Happy crafting!
Desiree

Supplies - Stampin' Up!
Stamps: Just Believe, Vintage Vogue
Paper: Naturals, scraps of designer series paper
Ink: Soft Suede
Embellishments: Antique Brad, fabric strip

Wednesday, March 16, 2011

Driving in my jammies

So on days when I am not going to work but still need to drive Emily to school I just go in my jammies. After all, no one is going to see me right? And as long as my hair isn’t crazy wild, it’s all good.

This morning I’m driving along and end up behind a woman who's car had stalled in a left turning lane. She was sitting in her car and didn’t have her blinkers on and we all ended up going around her. A few minutes later on the return trip I saw that she was still stalled and was now standing outside her car directing people around her. Poor gal was in a pink floral robe and slippers! I felt so bad for her, she must have been mortified! And just like me, I am sure that she thought she was just making a quick trip so why get dressed.

Now that I’ve seen that I’m thinking slipping on a pair of jeans is the way to go. No telling know when the old truck is going to put me in an awkward situation!

Recently I held my Spring Stamp-a-Stack. Everyone made four cards of four designs so I kept it really simple. Some of the products, like the Spring Vintage designer series paper, seam binding, and the Nature Walk stamp set are from the Occasions Mini.

Sunday I was out in Washougal with the Sew Desperate ladies for a card class. They are such a hoot! Over the next couple of days I’ll be working on my SheArt canvases. The last one I made looked awful! Maybe it was the beverage I was drinking, heeheehee! Since it's mixed media artwork, I have been able to use lots of my Stampin' Up! ink pads, stamps, reinkers, paper, ribbon and rub ons.  

Sale-a-bration is still going on for about another two weeks! Don’t miss out on getting free products, LOTS to choose from including stamps in the regular catalog.

Also for those interested in joining Stampin’ Up!, you get 15% off the price of your starter kit and a free bonus package worth $50. Take a look!


That's it for today. It's my mom's birthday (she passed away 9 years ago) and so I will toast to her with a good glass of wine. She would have been 69. I also thought it would be fun to find an age progression tool online and scan in a photo of her to see what she might have looked like today. Something fun and silly!

Have a great crafty day!
Desiree

Supplies (for top card)
Stamp sets: Nature Walk, Occasional Quotes (hostess)
Paper: Not Quite Navy, River Rock, Very Vanilla, First Edition Specialty Designer Series Paper 
Inks: Not Quite Navy, River Rock
Embellishments: Basic Pearls
Tools: sponge

Tuesday, September 7, 2010

My Play Date is over….

Here’s the last of my Play Date creations. I made several items and used them to change my display at Arts and Scraps. Things I have for sale are notepads, bookmarks, matchboxes, cards and the metal/cork/calendar from this post.

Here are the cards that I made:
playdate6 playdate9
playdate10 playdate11

I have completely depleted my Play Date Collection. Nothing left! I can hardly believe that I used it all up.

le-jardin8 So, later this month I’ll be teaching a class at Arts and Scraps. It’s a canvas class. I am really looking forward to it! We’ll be covering a canvas and then adding handmade flowers to it. The class is really all about creating the flowers. I’ll be teaching how to make 6 different ones.

I am preparing another class sample to present to Denise, who owns Arts and Scraps, for a second class on the same day. Usually Denise would be teaching however, she will be at Uncovered Ruby in Battle Ground for a Vintage Fair.

I’m feeling very vintage-y myself these days and have more projects rolling around in my mind.

Now would be a great time to join my team. Here’s why:
Greenhouse_Gala tote

Free Craft Tote Promotion
September 1 through October 18, receive a FREE craft tote—a $39.95 value—when you join Stampin’ Up! as a demonstrator!
Imagine sharing your love of Stampin’ Up! with this stylish and practical tote, patterned after our Greenhouse Gala Designer Series Paper and large enough to carry 12" x 12" card stock and a Paper Cutter, as well as punches, ink pads, and accessories. And with two Starter Kits* to choose from—Standard and Digital+—at a new lower price, there’s never been a better time to join the Stampin’ Up! family.

Contact me TODAY to get started with this tote-ally awesome opportunity.

*Sample Starter Kit contents pictured in tote

I’ve also been selling my retired Stampin’ Up! sets on eBay. My seller id is desireesellsstamps. I really need to add more items to my Etsy shop as well. It’s hard to find the time to do everything!!!

Have a great day!
Desiree

Thursday, July 15, 2010

Hello again!

2010-11_Idea_Book_and_Catalog So, it’s  been awhile since I’ve posted… Since then the new Stampin’ Up! catalog has been release and it is gorgeous! There isn’t a page in it that I don’t have something marked for my wish list!

There are so many project ideas that I can’t wait to start creating. I love that Stampin’ Up! has a supply list available for every project. It makes it really easy to CASE the catalog.

Definitely_Decorative_Brochure I’m loving the new Definitely Decorative catalog too. The chalkboard elements are so cool.  And the new styles are really fun. Just look at this cover… perfect for over a desk. What a fun and inexpensive way to add whimsy and practicality to your home. There are some holiday pieces from Halloween to Christmas that you will remember from last year.

Every year I have a fun Catalog Celebration at my house. Besides the catalog, everyone will receive a catalog kit, and special coupons. We will do a couple of Make and Take projects and have munchies. It’s not a party without games and prizes, right?

SANY1301 There is still a few weeks left for the Summer Mini. Here’s a card I made recently to thank some brides for their business.

The card base is Almost Amethyst with layers of Whisper White and Blush Blossom. The stamp sets are Blissful Bride and Vintage Labels (which was a Sale-a-Bration set).

You can just barely see the glitter on the ribbons of the wedding dress. I used markers to color the flowers and border along the bottom.

Meanwhile, I am impatiently awaiting my first order from this catalog… I focused on the Play Date collection. Love it!!! I will be designing a class or two around these products. My next order will be all about the vintage items. I am just drooling over that catalog…. can you tell?

Next week I will be getting crafty since it’s my week off. I will really try to get some more posts up on the blog too!

I’ve started selling my cards and other papercrafts at a local scrapbooking store, Arts and Scraps. This is my favorite shop and Denise (owner) and Lisa, her right hand gal, are fabulous! If you live in Clark County or the Portland Metro area, you gotta stop by. She also sells antiques and vintage goodies.

Thank you for visiting!

Desiree

Supplies
Stamps: Blissful Bride, Vintage Labels (SAB), Teeny Tiny Wishes
Cardstock: Almost Amethyst, Whisper White, Blush Blossom
Ink: Black Stazon
Embellishments: White  ribbon, Dazzling Diamonds
Tools: Scallop Edge punch, large Oval punch, Almost Amethyst and Blush Blossom markers, glue pen

Monday, June 7, 2010

Razzleberry Trio


This trio of cards were the projects for a class I taught at my local scrapbooking shop, Arts and Scraps. It was during an awesome two day crop! Anyway, I had some extra supplies from that event and decided to make up the card sets and sell them in my new Etsy shop. You can visit it here.

I have a few other items there as well. I plan on adding something every week. Hopefully you will stop by and take a look, perhaps something will appeal to you!

The set that I used for these cards is Vintage Vogue. The colors look awesome together: Rich Razzleberry, Certainly Celery and Whisper White.

Of the three, the bird card is my favorite. I love the bird punch! I punched the bird out of textured cardstock. I used the color spritzer with the Rich Razzleberry marker on the Whisper White cardstock, then I added the Vanilla Smooch Spray over that. It gives a beautiful sparkly finish. LOVE IT!!! Love it so much that my bottle is now empty!

The next card is the "friends" card. I used clear emossing on the "F" and on the border along the bottom. I wrapped celery satin ribbon around the cardstock and left a tail in the front. The flowers are white paper flowers with a purple gem in the center. I couldn't believe I had the perfect match for the gem, found it in one of those many unopened craft bags in my craft storage area.


I used the Faux Silk technique on the third card. I rolled the Very Vintage wheel in Certainly Celery on tissue. Then I stamped the flowers in Rich Razzleberry. For this technique you wad up the tissue into a tiny ball. I had to wait a few minutes before doing this because the ink doesn't dry immediately like it does on cardstock. Anyway, next you unwad the tissue being very careful not to tear it. Spread gluestick on your cardstock and then careful lay down the tissue, leave the wrinkles. Then trim your tissue to the size of the cardstock.

I used the Rich Razzleberry Polka Dot Grosgrain ribbon, placing a knot in the front. The sentiment says "Life happens. Love helps."

In my Etsy shop, I've bundled the cards along with envelopes and tied them with pretty celery satin ribbon. They are just waiting to zoom out in the mail.

The rest of this evening I am working on card designs for the Card Buffet happening later this month.

Thank you for visiting and have a fabulous day!

Desiree

Supplies
Stamps: Vintage Vogue, Very Vintage wheel
Cardstock: Rich Razzleberry, Certainly Celery, Whisper White
Ink: Rich Razzleberry, Certainly Celery
Embellishments: Celery satin ribbon, Rich Razzleberry polka Dot grosgrain ribbon, paper flowers, rhinestone gem, clear embossing, Vanilla Smooch Spray
Tools: Bird punch, color spritzer,  paper distressor, five petal punch, Rich Razzleberry marker.

Friday, June 4, 2010

Elegant cards set

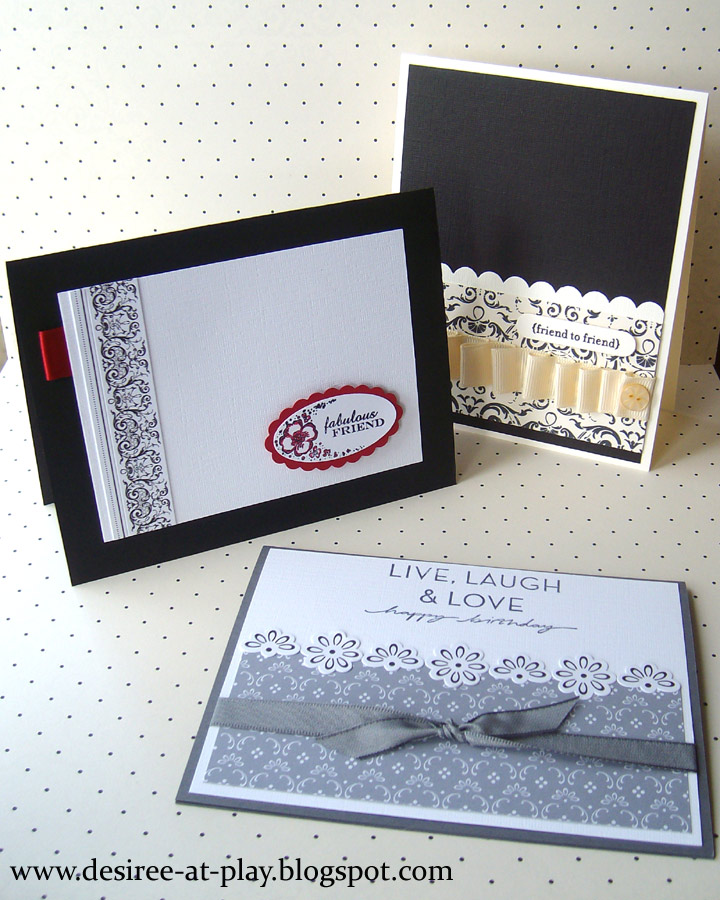
This trio of cards is a sampling of the fifteen cards we'll be making in my Elegant Cards class on June 17. For details check out my Facebook page or my Stampin' Up! Web site.

I used the Guest Book Simply Scrappin' Kit and while it is wonderful for scrapbooking a wedding event, it is also great for making cards.

I used a variety of sentiments and embellishments. All the main layers of the cards are the textured cardstock which gives them a nice and luxe feel. The color palette is Basic Black, Basic Grey, Very Vanilla and Whispr White. I really enjoyed working with these elements.

In the class we'll be using ribbon, hodgepodge hardware, pearls, buttons and brads. Sentiments vary from birthday, thank you, sympathy and general friendship.

Would love to see you in class! Sign up by dropping me an email!

Desiree

Supplies
Guest Book Simply Scrappin' Kit, various stamp sets and embellishments

Monday, May 31, 2010

Elements of Style - Leaves

Another Elements of Style card. I used a Sketch For You To Try sketch by Jen Del Muro. This was fun to put together.

I colored the stamp with Old Olive, Not Quite Navy, and So Safron markers, then stamped on Very Vanilla. I also used the Color Spritzer and a Soft Suede marker. Plus I sponged with So Safron too.

I distressed the edges of the Very Vanilla, Soft Suede and More Mustard pieces. The card base is Not Quite Navy. There is vanilla satin ribbon over the mustard cardstock.

I used the Little Leaves sizzlit and cut leaves out of Old Olive. The sentiment is stamped in Soft Suede on More Mustard and punched with the 1" punch to fit in Vanilla Hodge Podge Hardware.
On a side note, my lovely daughter Emily received an award for Tolerance at the Clark County Youth Achievement Awards. She is also a Clark County Youth Commissioner and presented the awards for Family Life. She gave a speech to about 1,000 people and did very well. This year we could actually hear her! I am a proud mama!

Thanks for visiting!
Desiree

Supplies
Stamps: Elements of Style
Cardstock: Not Quite Navy, Old Olive, More Mustard, Very Vanilla, Soft Suede
Ink: Soft Suede, So Safron
Markers: Old Olive, Not Quite Navy, So Safron, Soft Suede
Embellishments: Vanilla Hodge Podge Hardware, Vanilla Satin Ribbon
Tools: Sponge, Color Spritzer, paper distresser, Sizzix Big Shot, Little Leaves sizzlit

Saturday, May 29, 2010

Elements of Style - Butterflies


This pretty card is one I case'd from the catalog, page 110. Don't you just love the Beautiful Wings embosslit???

I used the same color palette as the other cards I made using this stamp set. This was the third card for my Very Vintage class.

I stamped the image in Soft Suede ink on Very Vanilla cardstock and sponged So Safron on it as well. I layered that on a piece of Not Quite Navy that was punched with the spiral punch. Then I layered all of that onto Old Olive that I pierced along the edges. I wrapped linen thread around this three times. The card base is So Safron. The butterflies are Not Quite Navy.

I've finally put this set aside, I need to do some stamping with some other sets!

Thanks for stopping by, I hope you are having a fabulous day!!!
Desiree

Supplies
Stamps: Elements of Style
Cardstock: So Safron, Old Olive, Very Vanilla, Not Quite Navy
Ink: Soft Suede, So Safron
Embellishments: linen thread
Tools: paper piercer,  sponge, spiral punch, Sizzix Big Shot, Beautiful Wings embosslit

Thursday, May 27, 2010

Elements of Style Flower

I just love the Elements of Style stamp set. This is the first card that we made at my Very Vintage class. The tissue flower really makes the card!

I used Versamark to stamp the floral background on the Old Olive base and the torn More Mustard layer to add some interest. I used a wrinkled Soft Suede scallop border at the top and bottom of the Very Vanilla panel. Besides stamping in Soft Suede I also sponged in So Safron. I added Vanilla satin ribbon which is folded into pleats.

The flower is made of four layers of tissue cut with the Flower Layers die. I separated them and offset the petals. I used the three larger flowers. Next I put a brad in the center and crunched up the flowers. That took the most time because it's fun to squish the tissue and make it look just so. I ran a So Safron sponge over the tissue to give it a
I used a sketch from The Shabby Tea Room. That is such a lovely blog. little color. The I put a So Safron button threaded with linen thread in the middle.

Have a great day!
Desiree

Supplies
Stamps - Elements of Style
Cardstock: Old Olive, More Mustard, Soft Suede, Very Vanilla
Ink: Soft Suede, Versamark
Embellishments: tissuer, So Safron button from Button Latte, linen thread, brad, vanilla satin ribbon
Tools: paper distresser, scallop edge punch, Sizzix Big Shot, flower layers die

Sunday, April 25, 2010

Elemental Circles

I used the Fall To Layout #86 for this card. I've been meaning to use the sketches for some time but haven't had time.

Blush Blossom and Sage Shadow are retiring colors and I love them. So these may be the only two colors that I keep around.

I clear embossed the flower stamp on the Blush Blossom first. Next I stamped it in Basic Grey ink on Shimmery White and used pastels to color the flowers in. I also stamped the flowers in Basic Grey ink on Basic Grey cardstock and Sage Shadow cardstock. I punched out different sized circles and fit them in the corresponding area on the Blush Blossom. I used dimensionals to raise the Shimmery White layers.

Let me know what you think!

Desiree

Supplies
Stamps: Elements of Style
Paper: Blush Blossom, Sage Shadow, Basic Grey, Shimmery White
Ink: Basic Grey, Versamark
Other: Stampin' Pastels, clear embossing powder, dimensionals
Tools: Circle punches (3/4", 1", 1 1/4", 1 3/8"), heat gun  

Thursday, April 22, 2010

Soft Suede Bird

The Elements of Style stamp set is beautiful. I just love it! Here I combined So Safron, Soft Suede and Very Vanilla.

For the Top Note layer, I sponged the edges with both So Safron and Soft Suede. I also used the Color Spritzer with the Soft Suede marker. The background stamp was stamped in So Safron and then I used the thumping technique with the Soft Suede marker, then I misted it with water.

The bird is stamped in Soft Suede and cut out, then adhered with dimensionals. The sentiment is stamped in Soft Suede and the ribbon is Very Vanilla satin.

Besides playing with this stamp set I've been working on some items that I've created with the Cog Chipboard coming in the summer mini.

Speaking of minis, you only have a little over a week left to order from the Occasions mini catalog. There are some wonderful products available in it.

I need to give my daughter a ride to the store and get back to my craft table so I'm off. Have a great day!

Desiree

Supplies
Stamps: Elements of Style
Paper: So Safron, Soft Suede, Very Vanilla

Ink: So Safron, Soft Suede
Other: Very Vanilla 5/8" satin ribbon, Soft Suede marker, dimensionals
Tools: Sizzix, Top Note die, color spritzer, water mister, sponges

Saturday, April 17, 2010

Very Vintage

I had so much fun creating this card. I cased if from the front of the summer mini catalog that has just been released. Several of my best customers received theirs already! If you didn't, let me know and I'll get one to you.

My card is a different color combo, uses different stamps and a embellishments. First I used a texture plate for the Barely Banana base but only embossed the front. Then I sponged a very light coat of Sahara Sand to bring out the detail. I layered a piece of Cameo Coral on that. Next I took a piece of Certainly Celery and distresed the edges a little and layered it on the Cameo Coral. I set that aside to work on the next layer.

The next part was to use a piece of Blush Blossom and age it. First I used Blush Blossom ink and the En Francais background stamp and stamped a very light background. Then I used the color spritzer with a Close to Cocoa marker. After that I embossed with clear embossing powder and the filigree stamp in the Frineds 24-7 set. I sponged a little Sahara Sand over that. Lastly I really distressed the edges but good! Tearing, separating paper layers, a little ripping, rolling, etc. I did a little sewing in one corner - by hand, not machine. I stamped the sentiment in Chocolate Chip.

Now on to the embellishments....

I stamped flowers from Friends 24-7 on Very Vanilla cardstock with Sahara Sand ink and then used Stampin' Pastels to give them some color. Next I covered the entire piece with Versamark and clear embossing powder to give it a nice shine. I used the Sizzix and Beautiful Butterflies die to die cut it. In retrospect, I think I should have sponged the edges a bit. I tied a bit of linen thread around the butterfly for a body and antenae.

I stamped the sentiments in Chocolate Chip on Very Vanilla and cut them out. I adhered "FRIENDS" over the same word on the Blush Blossom layer and adhered "24-7" where I would put the Very Vanilla Hodgpodge Hardware over it. I added a little fold of Certainly Celery satin ribbon under the hardware.

I love how the layers of texture look on this card so I decided to make a second one. It is very similar however I used the bird punch instead. And I added a pearl in the middle of the stitching.

Again, I love how both cards turned out. It is really nice to be able to case something, change it up a bit and make it yours.

I did use some soon-to-be-retired colors: Barely Banana and Cameo Coral. Stock up before they are gone!!!

Thanks for stopping by!

Desiree

Supplies
Stamps: Friends 24-7, En Francais
Paper: Barely Banana, Cameo Coral, Certainly Celery, Blush Blossom, Very Vanilla
Ink: Sahara Sand, Chocolate Chip, VersaMark
Other: Close to Cocoa marker, Cameo Coral and Certainly Celery pastels, linen thread, pearl, Very Vanilla Hodgepodge hardware, Certainly Celery satin ribbon, clear embossing powder
Tools: Sizzix Big Shot, Beautiful Butterflies die, Harlequin texture plate, Bird punch, distressing tool, paper piercer, needle & thread, sponge color spritzer

Sunday, April 4, 2010

A little two-step stampin'

Just in case you aren't familiar with two-step stamping, or need a refresher, I put together this little photo "how-to" for you. The only stamp set that I have handy is a retired set however there are several great sets in the catalog and some of them are ON SALE NOW! For this project I am using the masking technique along with two-step stamping.

First, I am stamping the outline stamps on a post-it and then cutting them out to create the masks. I stamped near the top of the post-it so that the sticky part is underneath my mask. That way they stay in place while I am stamping over them.
 
I stamped a row of leafy stems in Chocolate Chip ink along the bottom of my Very Vanilla cardstock.
Covering the stems with the mask allows me to stamp the next row of flowers without stamping on the leaves. I only cut two leaf masks so I'll have to move them over.
I've stamped the solid part of the leaves in Certainly Celery. You can see how the row of flowers appears behind the leaves.
Using the leaf masks again, I am stamping in Cameo Coral for the solid part of the flowers. You will notice that the solid part and the outlines do not exactly match up, they are designed that way.
Here I am using the flower masks that I cut out so that I can add another row of flowers.
Here you see the second row of flowers with Blush Blossom centers.
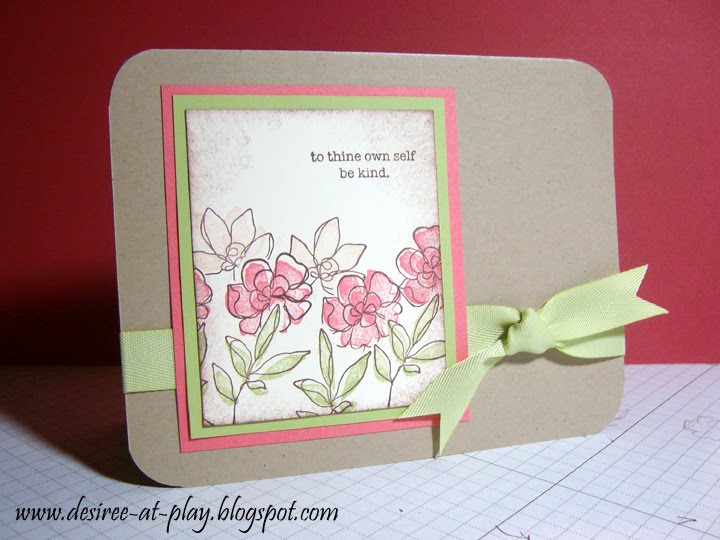
I trimmed the cardstock down a bit and sponged Chocolate Chip around the edges as well as adding a sentiment in Chocolate Chip ink. This piece is layered on Certainly Celery and Cameo Coral and adhered to a Kraft base. The ribbon is Certainly Celery twill, from Sale-a-Bration 2009.
Here is the end result. Thanks for stopping by. I hope that this inspires you to do a little two-steppin' yourself!

Desiree
Supplies
Stamps: Botanical Blooms (retired)
Cardstock: Very Vanilla, Kraft, Cameo Coral, Certainly Celery
Ink: Chocolate Chip, Cameo Coral, Certainly Celery
Embellishments: Certainly Celery Twill (SAB 2009)