Showing posts with label classes. Show all posts

Sunday, October 27, 2013

My Santos doll – completed!

www.desiree-at-play.blogspot.comI finished her!!! My first Santos doll! A few months ago I signed up for Jennifer Rizzo’s class to learn to make Santos Dolls. 

Prior to this I hadn’t heard much about Santos Dolls, but I had seen a few here and there in antique shops and around the web. I am intrigued by them. When I saw the class advertised, I couldn’t wait to sign up and learn how to make them myself.

It took me a little bit to gather the supplies… the craft stores that I go to (Michaels and Craft Warehouse) did not have the three main ingredients… paper mache eggs, paper mache mannequin, or paperclay. It took some searching online to find the eggs and the right size mannequins. I was really surprised at that. Creative Paperclay was readily available online. When I finally found them,  I accidently ordered 24 eggs, heeheehee!

www.desiree-at-play.blogspot.com
Jennifer did a really good job of walking us through sculpting the face. She went step-by-step and broke down each part of the face into it’s very simplest form. Even though my face is a ‘bit’ off, I felt successful because it is actually a face and not some weirdly deformed mass of clay.

www.desiree-at-play.blogspot.comThrough this class I also found the courage to experiment with mixing my acrylic paints to create the exact color I wanted for skin tones and the dress. Speaking of the dress, the first layer is book pages and the second layer is 7 Gypsies tissue paper. They I made a glaze of the dress color to go over it. I’ll be trying the cage design next.

The necklace features a piece from my molton lava stash. More about that here. I felt the little cross was perfect in size and concept given the religious connotation of the doll. 

www.desiree-at-play.blogspot.comNow that she is finished, I’ve brought her out of my studio. She looks lovely in my living room. I am excited to start the next doll. Perhaps I’ll create a series – designed around the major holidays or seasons.

Thanks for stopping by to take a peek!

Have a great day!
Desiree

Tuesday, April 9, 2013

12 Tags of 2013–April

12 Tags of 2013 - April
This was a fun tag to make. Tim Holtz’s techniques were all about creating a patina look using Distress Paints.
I don’t have all of the supplies that he used so I did have to make some substitutions.

I’ve run out of the manila tags so I just cut a piece of watercolor paper. It generally works well for the techniques.

The Distress Paints that I used were: Broken China, Salty Ocean, and Wild Honey. To add a little metallic to it I had to substitute Bronze Distress Stain and for the green I used Peeled Paint Distress Stain.

I do really like the creamy texture of the Distress Paints. Soon I plan on getting the metallics. The colors blend really nicely.

The stamp is from the Tim Holtz Sewing Blueprint by Stampers Anonymous.

12 Tags of 2013 - April

The clear surface that Tim stamped on is called Clearly for Art, but I didn’t have that (hadn’t even heard of it) so I grabbed a piece of transparency. Clearly for Art can be heated and shaped. I’m gonna get me some! Don’t try heating a transparency… because it curls up and gets brittle. Yep, tried it…

12 Tags of 2013 - April

So after stamping on the transparency, I cut it out and kind of folded it in half to give it a little dimension. Then I used Glossy Accents to glue it in place.

12 Tags of 2013 - April

I patina’d some letters and metal embellishments using the same paints and stains. The triangular piece is something I made in the Molten Lava class I took recently.

12 Tags of 2013 - April
The ribbon was colored by swiping  Broken China paint and Bronze stain on it.

So this is my tag. Did you make  a tag for April?

Busy time ahead… I won a spot in Jeanne Oliver’s The Journey of Letting Go mixed media class that started today (yay!) and she extended a second spot to each winner to give to a friend. So I picked my daughter, Lilly, who is getting back into sketching and painting. I can’t wait to share art with her! So thankful to Jeanne for her generosity.

Second, I’ll be at Terri Brush’s Spring Art Camp at Lincoln City. So fun. It starts on Thursday evening and runs through Monday morning. My very first art retreat! WooHoo!!!

What are your weekend plans?

Thanks for visiting!
Desiree

Edited to add: This tag was a winner!!! So excited!!! Thank you all for the well wishes.

Monday, March 25, 2013

Watercolor puddles

Watercolor puddles turned into root vegetables…

Watercolor puddle veggies

The Art of Spring is yet another online class that I am taking. I am SO glad that these classes are available for a full year because it takes me that long to get through them!!! Yeah, I am in the midst of six classes right now and three more are starting in April. Plus, I am trying to do some challenges here and there. Have I taken on too much?

Watercolor puddle veggiesOk, back to watercolor puddles… Junelle Jacobson, our fabulous teacher, had us create pages of puddles, drips, and drops in a few different color combos on watercolor paper. The trick is to keep the colors from blending too much and becoming a muddy yuck. I had some trouble putting together some colors that I really liked. We started with orange and added a bit of green, blue and red. We wanted the watercolors to be really wet so that they would run down the page when it was held up. Adding a drop of water helped. We also used different brushes to get different widths of runs.

Watercolor puddle veggies    Watercolor puddle veggies

The basis for this exercise was to become familiar with what different brushes can do. And so that we create our puddles in vain, Junelle encouraged us create something with our puddles. I went with one of her suggestions to make veggies out of mine.
Watercolor puddle veggies
I sketched and cut out the veggies and leaves. I used a fine black pen and a few markers in shades of grey to make a ground line so that my veggies could be underground. I glued the veggies into my art journal and outlined them with a black pen. Next, I shaded around them with markers and charcoal pencils.

Watercolor puddle veggies

Here are my beets with a radish on either side. Carrots enclose the row on both sides. I kept the background very neutral so the colors would pop.

Watercolor puddle veggies

I don’t really know much about veggies. And I don’t like beets or radishes. Maybe next time I’ll make fruit.

Watercolor puddle veggies

Are you a fruit or veggie person? Raw or cooked? Do you grow your own or shop at a farmer’s market?

Thanks for visiting!
Desiree

Monday, February 18, 2013

La petite boutique

Have you heard of Junelle Jacobson? Last Spring she taught an online class called The Art of Wild Abandonment. This is a sketching class and it was really informative and enjoyable. We started out sketching radishes! I’m not really a sketcher so I wasn’t sure how I would do. Really I just followed along with the things that Junelle sketched. I like her whimsical style.

La petite boutique

La petite boutiqueHere is one of my projects, La Petite Boutique. First, we sketched it out and then put together a finished piece. It was fun to come up with a few bits of clothing and accessories. For the background I used white crackle paint, a floral stamp with black Archival Ink, and Vintage Photo Distress Ink

Next I cut the clothing, etc.,  out of patterned paper that I pulled out of my scrap bin. I put a good coat of Mod Podge over the background, and over the papers before outlining everything.

la petite boutique
la petite boutique
I am planning on taking The Art of Wild Abandonment 2 soon. I have to figure out when I can squeeze it in between all of the other online classes that I am taking! Do you take online classes?

Thanks for visiting!
Desiree

Monday, August 23, 2010

Getting ready for school!

playdate1
This photo is a bit small… hopefully you can see it ok. These projects are the class samples for next Tuesday’s class. This would make a great set for a student just starting the school year!

I used the Play Date collection: designer series paper and accents. The top portion is a metal sheet covered with paper with a square of cork board. Below that is a monthly calendar hanging on rings with a decorative piece next to it that can be changed out.

Additional projects include a pencil holder with two owl pencil toppers and number blocks.  You can barely see them, but there are three magnets and 2 push pins as well. Not pictured are a set of lunch notes to include in the student’s lunch box. How fun is that?

The Play Date Accents sheet comes with a bunch of adhesive die cuts to use with the calendar.  

The second class, Play Date #2, will follow along the same organizational theme with folders, labels, binder clips, notepad, and a frame for the first day of school photo.
Needless to say I am loving this collection and playing with it. I’ll be giving all of these class samples to my sweet Lunch Buddy at Hough Elementary School.

Have a great day!

Desiree

Supplies
Paper: So Saffron, Real Red, Early Espresso, Tempting Turquoise, Play Date Designer Series Paper
Embellishments: Play Date Accents, buttons, Early Espresso 1/8” taffeta

Friday, June 4, 2010

Elegant cards set

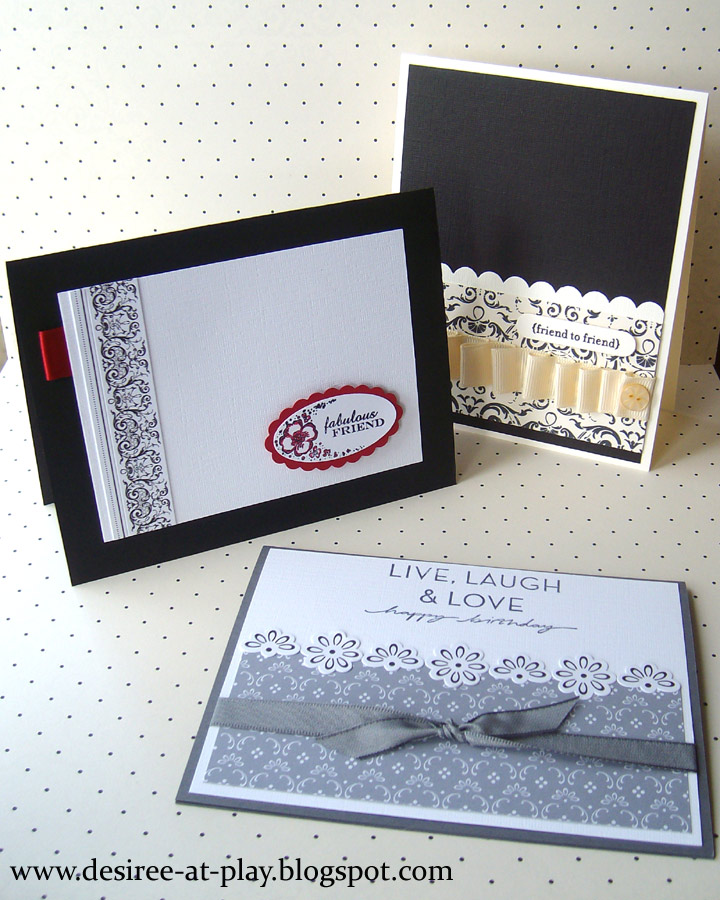
This trio of cards is a sampling of the fifteen cards we'll be making in my Elegant Cards class on June 17. For details check out my Facebook page or my Stampin' Up! Web site.

I used the Guest Book Simply Scrappin' Kit and while it is wonderful for scrapbooking a wedding event, it is also great for making cards.

I used a variety of sentiments and embellishments. All the main layers of the cards are the textured cardstock which gives them a nice and luxe feel. The color palette is Basic Black, Basic Grey, Very Vanilla and Whispr White. I really enjoyed working with these elements.

In the class we'll be using ribbon, hodgepodge hardware, pearls, buttons and brads. Sentiments vary from birthday, thank you, sympathy and general friendship.

Would love to see you in class! Sign up by dropping me an email!

Desiree

Supplies
Guest Book Simply Scrappin' Kit, various stamp sets and embellishments

Friday, April 2, 2010

Sunny Days

Happy sunny days! Well, that's what I am wishing for. Here in the Pacific Northwest our sunny days are valued and beautiful! We don't get enough of them! It's really not that we get rain all the time, we just have grey skies all the time.

So the Sunny Days Simply Scrappin' Kit was just the thing to cheer up a bleery day!

I'll be having a class to make cards from this kit on May 6. So if you would like to join us, send me an email!

My class offerings are on my Facebook page and my Stampin' Up! Web site.

Here are just three cards I made of fifteen using about 1/2 a kit, some Whisper White cardstock and various embellishments. The cards have a variety of sentiments and I always include envelopes as a courtesy to my class attendees.

Hope to see you in class!
Desiree

Supplies
Sunny Days Simply Scrappin' Kit, Whisper White cardstock, various stamp sets, various embellishments

Wednesday, January 20, 2010

The sun is not out yet...


I thought I would throw up a quick post since my Em is in the shower and I gotta take her to school in a few minutes. Not enough time for me to get ready so I'll do that when I get back. Poor Lilly woke up barfign this morning. ACK!!!! My stomach is still roiling...

This is another card for class Thursday evening's class. I cased it somewhere, probably on Splitcoast. I really should jot down notes about what I make because I never remember.

Anyway, I purchased a lovely Lemon Divine Bistro Cake. My mouth is just watering!!!

It just dawned on me that I am not sure that I've created all the components for the class. Did I put together all four cards? I know I still need to come up with the box and clean off my craft table. It has to be all set up before I hit the hay tonight because I work all day and I'm having lunch with a friend tomorrow.

Well, I better go yell at Em, she going to be LATE! Thanks for stopping by! Have a great day!

Desiree

Supplies:
Stamps: Sincere Salutations
Cardstock: Rich Razzleberry, Tempting Turquoise, Whisper White
Designer Series Paper: Kaliedoscope
Ink: Rich Razzleberry
Embellishments: Filigree brad, Playground button, Rich Razzleberry Polka Dot ribbon, whtie floss
Tools: Sizzix Bigshot, Top Note Die, Curly Label Punch

Friday, November 13, 2009

Cards and Coffee!


This year's Cards and Coffee event will be on Saturday, November 14 from 10 am to 1 pm. We'll be making holiday cards - as many as you want or need.

Mugs offers great coffee and wonderful pastries. It's locally owned and operated and has a very comfy atmosphere. Fresh VooDoo donuts arrive every Saturday morning!

Mugs is located at 9230 HWY 99 next to Blind Onion (between Walmart and Winco).

Cards will cost $2 each and that includes the envelope!!!

The designer series paper on the Sahara Sand/Ruby Red card will vary with other patterns in the Holiday Lounge DSP package and a Taken with Teal combination will also be offered.

Get your Holiday card list out and put this on your calendar now!

See you tomorrow!!!

Desiree

Wednesday, September 2, 2009

Flowers and trucks and bears, oh my!

Pretty soon I'll be teaching a 3D card class. These are my samples. This one is my favorite! I used the Live with Passion set which was perfect to make a garden scene. The base is Old Olive cardstock.

It's an 8x8 square scored at 4" both ways. Score a diagonal line from the center to one corner. Then cut one of the score lines from the edge to center - see diagram.

The background is Kraft stamped with Old Olive and the flowers are stamped on Confetti White. I inked the flowers in Crushed Curry, then colored the stems with an Old Olive marker and sponged the flower centers with Chocolate Chip.

After cutting out the flowers, I played around with the placement and which ones will be popped out. I cut thin little strips (1/8 x 1") of Kraft and folded thim in a zigzag shape then adhered them to the backs of the leaves/flowers.

Adhere the two flaps together to make the sides. Now the diagonal score line will fold up and the card will now fit into an A2 envelope.

The second card was made with the Look Here Sizzix die in Bermuda Bay and Rich Razzleberry. I used the Loads of Love set for the image and colored with chalks and markers. There is a spot that will hold a gift card or in this case a truck! In this case, the cardstock is so bright that the truck is lost - it looks much better in person.

Since this will be a class, I tended to keeping this one simple in the interest of time. However I can imagine all kinds of fun things that could be done to spice up a card made with this die.

The third card is a shadow box card. Take two equal sized cardstock pieces and score at .5 and 1" on each side. Create your scene - I used the Under the Stars set and colored with watercolor crayons. I wish that I had used Creamy Caramel for the front piece of cardstock. I used Confetti White for the back piece of cardstock.
That's it for tonight! Oh, and Stampin' Up! softened it's restriction just a bit so I don't have to delete as many blogs off my blogroll as initially required. Regardless, the post where I've listed my favorite blogs will always be just a click away in the "labels" section.

Have a great day!!! Happy crafting!
Desiree

Saturday, August 22, 2009

Beautiful pink

This is the card I sent out to my hostesses from the past twelve months. Every year I invite them over for a free Annual Hostess Appreciation Brunch plus we make two projects. This year I have also encouraged them to bring a guest. Everyone deserves a really nice stress-free Sunday!

For this card I decided to use the latest sketch from Sheetloads of Cards. The paper is retired SU dsp called Bella Birds and I used a stamp from Thoughts and Prayers and a sentiment from A Beautiful Thing. I also used Close to Cocoa and Chocolate Chip cardstock and Chocolate Chip double stitched grograin ribbon. I stamped in Chocolate Chip ink on Whisper White and used rectangle nestabilitiesfor cutting, embossing and masking. You can just barely see the embossed edge. I masked that same edge and used the color spritzer tool and a Pretty in Pink marker to give the center panel just a bit of color. I rushed through the photography - sorry about the crappy photo!

I have been working on my class schedule and have September and October classes on my Web site now (http://www.desiree.stampinup.net/) so take a look and sign up to create something new! New this quarter are classes during the day and special class discounts for purchasing products at sign up. Fun class for kids and their favorite adult - Animal Crackers - on August 31.

On Thursday night I joined several of my fellow demonstrators at my upline's house for a Stamp Together. It featured MANY of the new products from the Winter Mini which starts September 1. There are so many cool items!!! I don't know what to order first!

Just a few exciting things: jewelry, Build-a-Bear, Digital Design Studio, holiday stamps, paper, embellishments! Forty pages of faschination! Need a mini? Contact me!!!! {desdm at msn dot com}

I am pooped! I opened at Mugs today ***Sunday, 8/23 is acoustic music night from 6-9pm *** and then spent the day cleaning and cooking for a small BBQ celebrating Lil's birthday. Yeah, it was supposed to be last weekend but the weather wasn't cooperating so we moved it. I am just going to crawl into bed and CRASH!

Have a creative day and thanks for visiting!
Desiree

Saturday, June 27, 2009

'Bella Bleu' Birds

This is an upcoming class I will be having on July 7. I used the Friends 24-7 set with Bella Bleu DSP. We'll be making four cards and a cute box to put them in.

The color palette of the DSP is Not Quite Navy, Kraft and Very Vanilla. I also added Close to Cocoa, Chocolate Chip and a smidge of Mellow Moss for the flower stem and leaves on one of the cards.

I also used En Francais background stamp on one card. At first I thought it was difficult to work with this set because the stamps don't seem to really go together. However as I stamped and created I ended up really enjoying the set and I love how the cards turned out.

The box is using a pattern by Lauren Meader from Papertrey. Other items that I used for embellishing are tafetta ribbon dyed Not Quite Navy, Very Vanilla 5/8 grosgrain, button from Button Latte, chalks and VersaMark. There is one card stamped with a greeting from All Holidays.

Here are close up photos of the cards and box:

Thanks for stopping by! I hope you are having a great weekend and have a little time to spend in your crafty spot!
Desiree

Monday, May 25, 2009

Cupcakes!

Ok, so it's not a cupcake, it's a cupcake box! Isn't it just super cute? The template was a freebie on the Stampin' Out Alzheimer's site. For a small donation, you can join in on the fun, freebies, prizes and more!

Speaking of cupcakes, Mugs (the coffee shop I work at on Saturdays) is now serving Saint Cupcakes. YUMMY! Mugs is on HWY 99 right next to Blind Onion.

Last night I had fun making different Party Favors! I used the Big Shot and exclusive SU! dies. Once I started I was really on a roll. They hardly use and supplies and went together easily.

In this photo you can't see how pretty the little wedding match box is. I used Shimmery White cardstock and the butterfly is made of textured Parisian Breeze paper and then glittered on the edges of the wings. Really pretty!

Happy Memorial Day! Enjoy the sun! Thanks for stopping by! ~Desiree

Sunday, April 19, 2009

For the love of chocolate

I've been wanting to do a chocolate class for awhile now. Here it is... The projects are a chocolate book with chocolate sayings inside (lower right corner), a scratch and sniff card, a ghirardelli box, and stamping onto chocolate (you can't see it well here).

All of the instructions are found on Splitcoast Stampers - some in the resources section and some in the forums - do a search for chocolate.

I used the Pink Flamingo designer series paper - which I love!!! Plus Whisper White, Basic Black, Pink Pirouette, Real Red and Summer Sun cardstocks. For ribbons, there are white organdy, black grosgrain and linen thread.

Several stamps sets are used here as well: Crazy for Cupcakes, Oval All, Sweet Serendipity, Say it with Scallops, All Holidays and Embrace Life (this was used to stamp in the chocolate).

Stamping in chocolate is a bit tricky. First you have to sanitize your stamps - several gals on the SCS forums helped me out with that. Wipe down well with rubbing alcohol and then clean well with dishsoap and toothbrush. I applied a bit of vegetable oil to the stamp to keep it from sticking to the chocolate. Chill your chocolate, then with a heat gun melt it just a touch till you see a sheen. This is like 3 seconds, seriously. Then I carefully pressed the stamp into the chocolate and lifted. Here you might have to ease the chocolate off. Next go clean your stamp again.

I went through SEVERAL Hershey's bars to get one image to look halfway decent. But it was fun and yummy!

Have a great day and thanks for visiting!!!

Desiree

Saturday, March 28, 2009

Life's too short

Here's another card we'll be making at my Funky Folds class on April 7. This is the first "Spring Card" (instructions on SCS) that I've made. I actually think of it as a "Frog Card" though!!! I inked up my Branch Out set from SU! and it is a great set. I loved Season of Friendship so much that I wasn't sure how I would feel about this set and when I finally ordered it I realized that I like it just as much.

The base is Really Rust and I layered Kiwi Kiss and Very Vanilla on that. The tree is stamped in Chocolate Chip, with Certainly Celery, Kiwi Kiss and Always Artichoke leaves. The tire swing is Basic Grey, bird is Baja Breeze and butterflies are Pumpkin Pie.

I added a saying from Many Happy Returns plus some vintage brads. A simple card but I really like how it turned out.

Thanks for visiting! I need to get back to my own blurfing now... heeheehee

Desiree

Wednesday, March 25, 2009

Sweet raspberry!

I just love this Raspberry Tart DSP from Stampin' Up! Isn't it sweet? This is a double fold pocket card. I haven't made one before and I wanted to include this in my Funky Folds class coming up in April. The colors included here are Whisper White, Pink Pirouette, Rose Red and Kiwi Kiss. The front is adorned with the Sweetest Stem Sizzlet ( a SU exclusive).

These are the cute tags that go in the pockets. The coordinating stamp set is called Sweet Stems and I used it on the large tag. The bottom of the tag is sponged with Kiwi Kiss and I watercolored the petals with Pink Pirouette reinkers. The center is Rose Red. Then I used Pink Pirouette striped ribbon. The smaller tag was stamped with Yummy and Warm Words. I decided to cut the Yummy stamp apart so the curly brackets are separate from the words that were inside. Yummy is a Sale-a-Bration set.

That's it for me tonight1 I gotta go to bed and read. I am almost done with the fourth Twilight book, the movie is playing in the background....

Tuesday, March 10, 2009

Little birdie, birdie

I came up with these cute projects this evening for a class I am having next week. The Good Friend card is a CASE of this card by Dig This Stamper on SCS and the card with the bird on it is a CASE of this card by juls716 on SCS. The tea bag holder was based on one I saw on SCS by paperball. The fourth project is an owl magnet. I have a few more ideas to make him even cuter!

If you'd like to join me for class on March 17 at 5:30pm in Vancouver, WA, drop me an email. I might have some St. Patrick's luck for you!

Thanks for stopping by!!!

Desiree

Tuesday, January 20, 2009

New Stampin' Up Catalog is here!!!

And it's beautiful!!! I made up my wish list and it came up to about $500!!! Gosh! There is so much to look at... I love so many of the new sets and all the new accessories! Catalogs are $9.95, let me know if you want one. Well worth the money!
There are also new Decor Elements. Lots of new designs and colors.
I also put together my class list for February thru April. If you live in the Vancouver or Portland area, shoot me an email and I'll get my class list to you!
Love You Much Promotion is still going on and I'll be having a class on February 5 featuring this fabulous bundle. Email me if you would like to join me!
Thanks for visiting!

Monday, November 17, 2008

Little Snow Guy

I'm trying to get in to the holiday mood.... It's really hard because I wanted summer to last longer, then all of a sudden it was fall, and now winter is fast approaching.

I used Beate's sketch for this card. She posts a new sketch every Friday. If you haven't taken a look at her cards, you should. They are awesome! Anyway, I pulled out my Jolliest Time of the Year snowman and stamped him with black stazon on to Shimmery White cardstock. Then I painted him with a wet brush and ink. You can't really see the Baja Breeze shading. I punched him out with the labels punch and sponged the edges with Not Quite Navy (which I used for the sentiment as well). The cardstock is Baja Breeze and Kiwi Kiss and the DSP is retired from last year. I can't remember offhand what it was called but it was the holiday paper with snowflakes and all that.

Ok, the brads are not SU, they look like real silver and they are from "All Sorts of Things". I've had them for YEARS and I only have 6 left. Then, of course, the snowflakes are from the Little Felt Flurries.

Well, I guess I can start thinking about Christmas now.

Pull out your calendars and mark this down... "Espresso Yourself" at Mugs Coffee on December 6. Come on in and make some holiday cards and enjoy the best coffee, espresso and pastries in town! More details coming soon!!!

Wednesday, October 8, 2008

WooHoo! Sunshine!

Yes, I will be cheering every time there is sunshine between now and June! The rainy season here in the Northwest has begun and I don't love it. What I do love is sitting at my craft table and making things!!! Take a look at some of things I've made recently:

Later this month I will be having a Stamp Camp at my house, Saturday, October 18 actually. I've broken it down into 3 classes. $25 for one class, $45 for two classes, and $65 for all three classes. We will be making fabulous gift items that will be great for the holidays!

The first class is a chipboard calendar class using the great calendar kit available in Stampin' Up!'s Winter Mini. This little gem can be hung on a hook or nail and I will supply magnets for those that may want it to hang on a refrigerator. I enjoyed putting this together and I think you will too!

Class 2 is a wooden cigar type box that we will decorate and fill with cards, envelopes, and more. We are going to use the beautiful Parisian Summer Designer Papers - I love them!!! This photo shows some of the items we will be using and the color combo (Pink Pirouette, So Safron, Sahara Sand, and Bravo Burgundy). I wish I had a finished product to show you. This will make a great gift for someone who loves to send handmade cards but doesn't want to make them.

Last but not least is this framed piece. What a perfect gift for your favorite friend! Bring a photo, and we will dress it up with designer papers, rubons, and ribbon to make this wonderful piece.

Last day to sign up for these classes is Friday, October 11. Send me an email to desdm@msn.com.

Happy stamping!!!!